FURS certificate and business premise
The digital certificate you upload here is used by VegaERP to fiscalise (davčno potrjevanje) cash, card and similar payments. It is not used for eDavki or SPOT: those use a separate server certificate, uploaded on the same page (see Server certificate for eDavki and SPOT).
Setup has four steps: Certificate, Business Premise, Connection and Receipt Sequence. The wizard walks you through all four in order, and once you have set a step up you can jump back to it directly from the step indicator at the top.
Your company tax number must be set in company settings before you upload, and it must match the certificate. If it does not match, the upload fails.
Open the setup
In the left menu choose Accounting, then FURS Certificate under VAT and compliance.
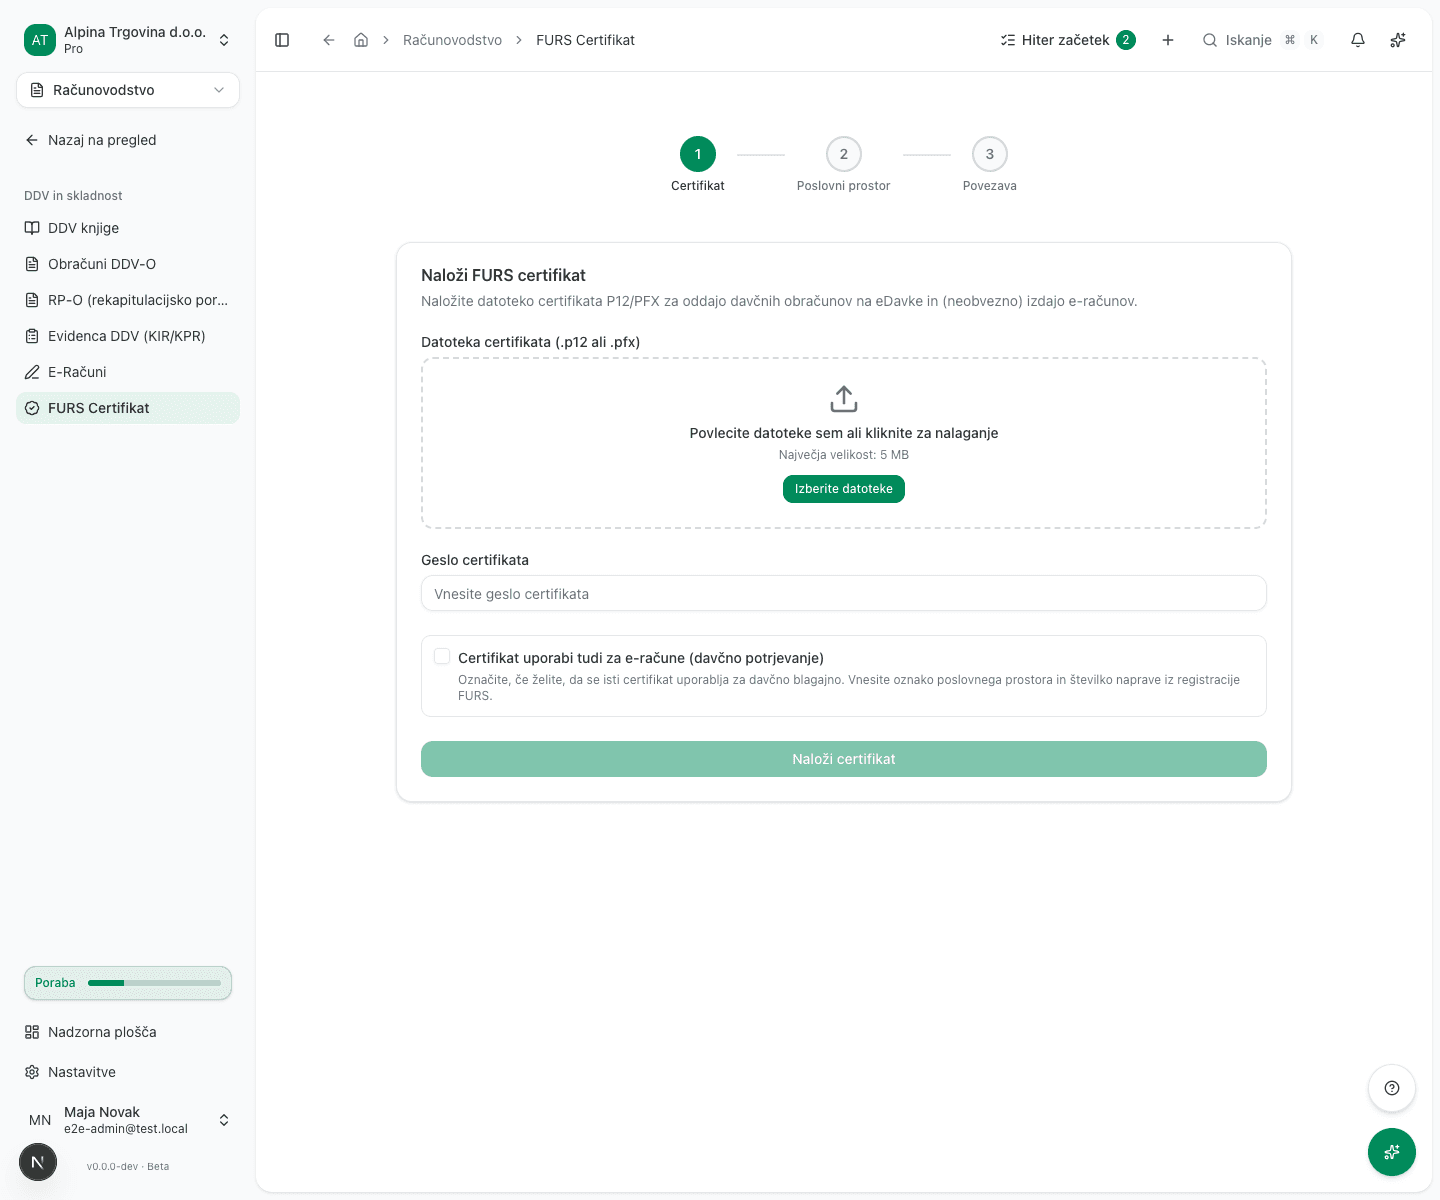
1. Upload the certificate
- Drag the file into Certificate File (.p12 or .pfx), or click to browse. The maximum size is 5 MB.
- Enter the Certificate Password. This is the password issued with the certificate.
- Enter the Business Unit Code and Device Number, both from your FURS registration. These are only needed for fiscalising receipts: leave them blank if you do not (yet) issue cash or card receipts.
- Click Upload Certificate.
Once accepted, the page shows the Tax number from the certificate and its Valid until date. Check that the tax number is yours.
The company’s admin can upload the certificate. If an accounting firm runs the company’s books, the firm’s accountant who has access to the company can upload it too, including for a client the firm created that has no admin of its own yet. An accountant employed by the company itself, with no firm behind them, cannot upload it; the admin does.
Fiscalising receipts is not about who the customer is. It depends on the payment method. You must fiscalise cash, card, cheque and payments a provider collects in bulk on your behalf (e.g. Stripe), but not a payment your customer transfers directly to your bank account. If you only invoice by direct bank transfer, you do not need this certificate at all.
2. Register a business premise
A business premise is where you issue receipts. It has to be registered with FURS before you issue your first fiscalised receipt.
- Click Register new business premise.
- Enter the Premise ID, for example
PE1. It is alphanumeric, up to 20 characters, and is printed on receipts. - Choose the Premise type. There are four options:
- Real estate for an office, shop or other permanent location. Also enter the Cadastral number, Building number and Building section number, plus the address. For online sales, choose the real estate at the company seat, even if the web shop server is hosted elsewhere.
- Movable object for a means of transport or a movable stall, for example a vehicle.
- Object at a fixed location for an object without real estate at a fixed place, for example a market stall or a kiosk.
- Individual electronic device only if you have no other business premises.
- Enter the Validity start date.
- Click Register with FURS.
Registered premises are listed under Registered business premises with a status of Registered, Pending, Failed or Closed.
You can look up the cadastral, building and section numbers on the e-Prostor portal at www.e-prostor.gov.si .
3. Test the connection
The Connection Test step calls the FURS server with your certificate automatically, as soon as you reach it. On success you see FURS connection successful! and the wizard moves you on to the next step by itself, no click required.
If the test fails, you stay on this step and see why: no certificate was found, the certificate could not be read, FURS could not be reached, FURS rejected the certificate (it may be registered to a different tax number than this company’s), or the test could not be completed. Fix the cause, then click Try again.
4. Receipt sequence
This step records where each business premise and device’s receipt sequence starts. Until you record it, FURS will not issue a fiscal confirmation and you cannot issue cash or card receipts.
If the uploaded FURS certificate does not yet carry its own marks, a short Enter the marks from your FURS certificate form appears first, with no need to re-upload the certificate:
- Enter the Business premise and Electronic device marks, exactly as they appear on your FURS certificate.
- Click Save marks.
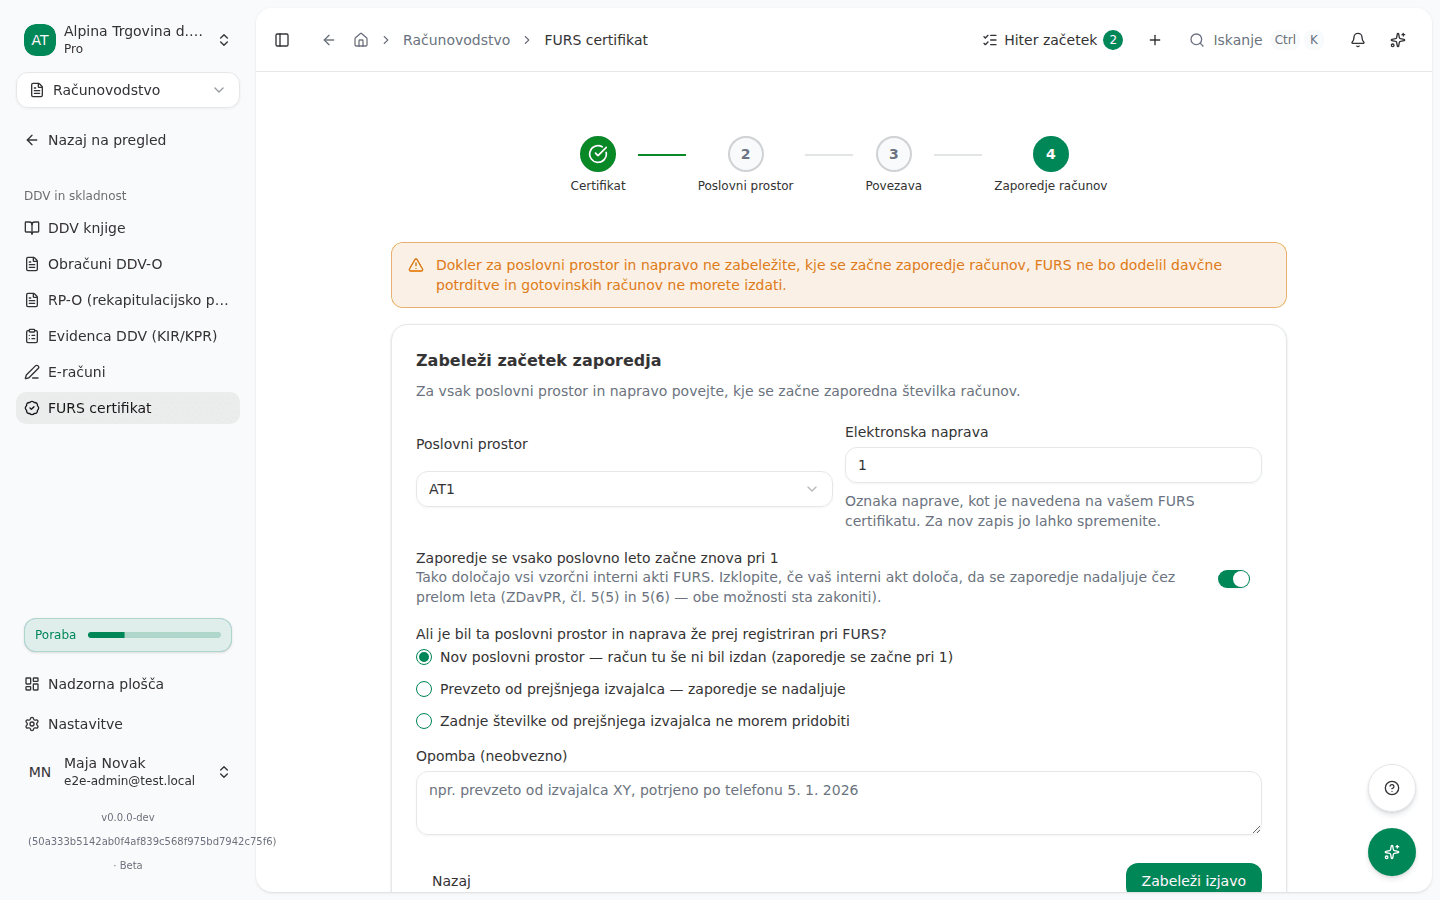
Once the marks are known, the Record where the sequence starts form appears:
- Choose the Business premise and adjust the Electronic device mark if needed (both fields are pre-filled from the certificate’s own marks).
- Check the The sequence restarts at 1 in each business year switch. It is on by default, because every FURS sample internal act prescribes it. Switch it off only if your internal act says the sequence continues across the year boundary: both answers are lawful (ZDavPR Art. 5(5) and 5(6)). With the switch off there is one sequence for all years, so a cash sale dated in December but settled in January simply receives the next number.
- Answer whether this business premise and device were already registered with FURS before:
- Brand new — no receipt has ever been issued here (sequence starts at 1), if you have not yet issued a receipt on this premise and device.
- Carried in from a previous provider — the sequence continues, if you took over from a previous software provider. Also enter the Business year and Last issued sequence number. Enter 0 if the premise was registered but no receipt was ever issued there.
- I cannot obtain the last number from the previous provider, if you cannot find out that number. Assign the device a new mark in your internal act (ZDavPR Art. 5(6)), click Use a new device mark, and answer with the first option above instead.
- You can add a Note (optional).
- Click Record where the sequence starts.
Once a receipt has been issued under a statement, its starting number can no longer be changed.
Either an admin or an accountant can record this. On a business run by an accounting firm with no admin of its own, the accountant may be the only person who can clear a refusal to issue a cash receipt.
Server certificate for eDavki and SPOT
Below the wizard is a separate card, Server certificate for eDavki and SPOT. Upload the company’s server certificate there (SIGEN-CA, Halcom or Rekono), carrying the company tax number. VegaERP uses it to connect to eDavki and SPOT. The fiscalization certificate cannot stand in for it, and the other way round.
- Drag the server certificate file into Certificate File (.p12 or .pfx).
- Enter the Certificate Password.
- Click Upload Certificate.
Do not upload a personal certificate here (yours or an employee’s). A filing at eDavki is signed by the person themselves.
Common issues
Wrong certificate password. The password does not match the file. This is the certificate’s own password, not your VegaERP account password.
The upload rejects the tax number. The tax number in company settings does not match the one in the certificate. Correct it in company settings and try again.
The connection test fails. Most often the certificate is not yet active at FURS, or it has expired. Check the Valid until date shown after upload.
The receipt sequence has not been recorded. The system refuses to issue a cash or card receipt until a statement records where the sequence starts for that business premise and device. Open Receipt sequence on this page and record the statement.