Subscription, usage and AI credits
This page pulls together four related topics: which plan your company is on, what that plan includes, how much of it you’ve used this period, and how to buy more AI credits if you run out. All four live in the sidebar under Settings → Billing.
Every team member sees AI usage, which shows where AI credits are going across the whole team. Plan & limits, Plans and AI credits are only visible to and editable by an Administrator.
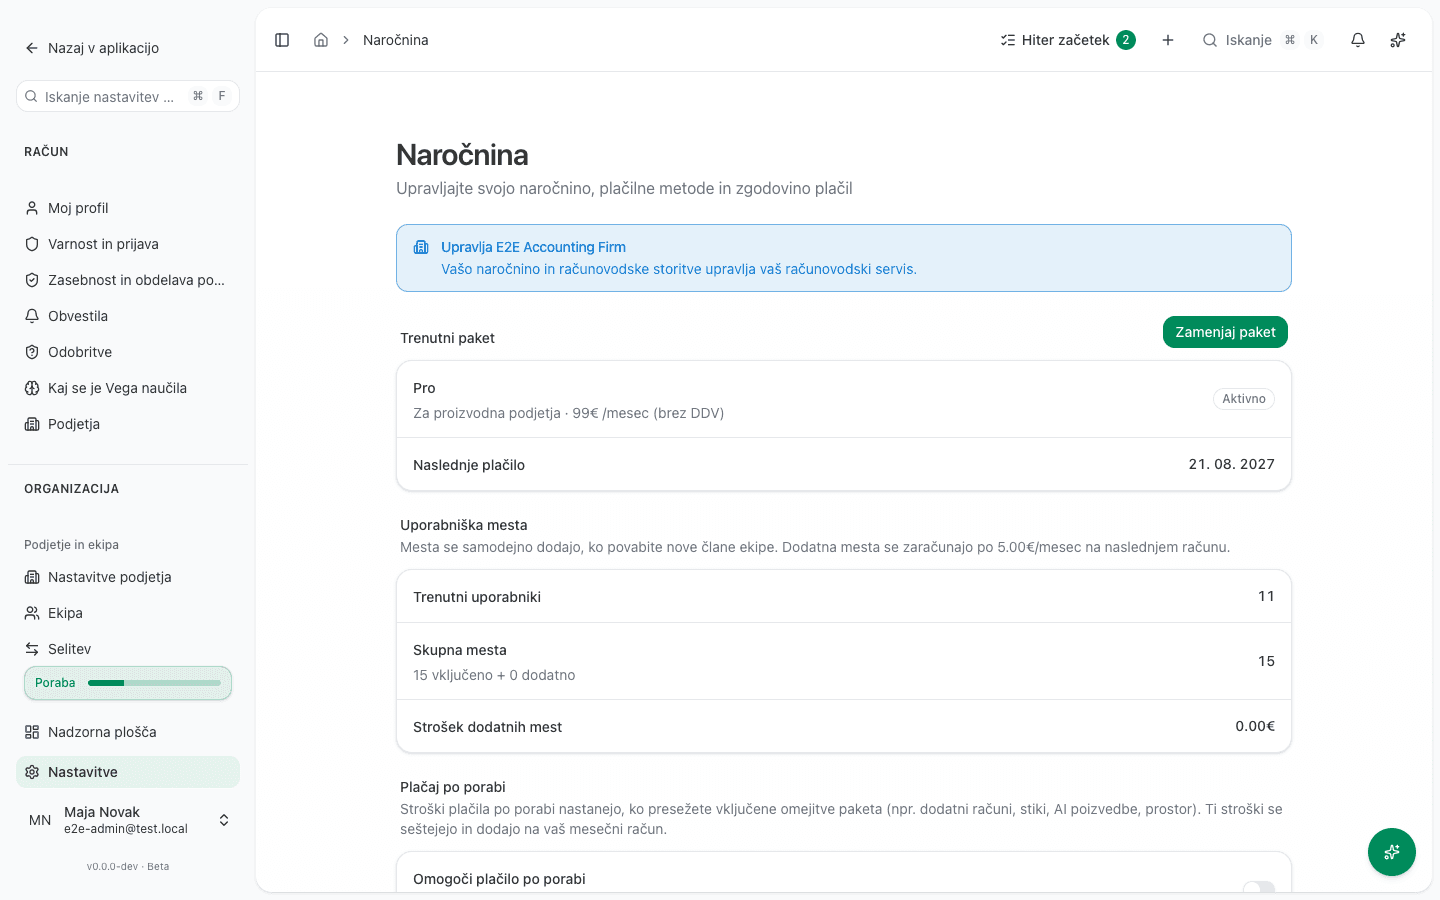
1. Check your current plan
- Open Settings → Billing → Plan & limits.
- In the Current Plan card, check the plan name, the monthly price (excl. VAT), and the date of the next payment or when the trial ends.
- To compare plans or switch, click Change plan (or open Plans directly). Prices and what each plan includes are shown on that page; we deliberately don’t repeat them here, since they can change.
- Pick a plan and click Upgrade, Downgrade or Subscribe, depending on whether it’s higher, lower or your first paid plan. The app shows a confirmation dialog with the amount before it charges anything.
What success looks like
The Current Plan card on Plan & limits immediately shows the new plan name. For an upgrade, the prorated cost is charged right away; for a downgrade, the prorated credit appears on your next invoice.
Cancelling your subscription
A cancellation takes effect at the end of the billing period you have already paid for. Until then the plan stays active; after that the company moves to the Free plan. The remaining period is not refunded.
- Open Settings → Billing → Plan & limits.
- In the Current Plan card, click Cancel subscription.
- The confirmation dialog shows the date the plan stays active until. Click Cancel subscription to confirm, or Keep subscription if you change your mind.
After cancelling, the card shows the date the plan stays active until and a Resume subscription button. Until that date it undoes the cancellation and the subscription renews as usual again.
A company managed by an accounting firm needs at least the Solo plan, so it cannot cancel. The card says so instead of showing the button. To cancel, first disconnect from the accounting firm.
2. Track usage against your plan’s limits
Every plan has its own limits per feature (for example the number of invoices per month, users, or storage). The Usage & Limits card on Plan & limits shows all of them in one place, grouped by category (Accounting, CRM, Inventory, Travel, System, AI).
- Open Settings → Billing → Plan & limits and find the Usage & Limits card.
- Each row shows how much you’ve used of what’s allowed this period. A feature with no limit is marked Unlimited.
- The AI row notes that AI usage is billed from your credit balance, with a Manage AI credits link straight to section 4 below.
When you hit a limit on a feature your plan doesn’t include at all, the app refuses the action with a notice naming which plan includes it, and offers View Plans & Upgrade. When you hit the monthly limit on a feature your plan does include (for example your invoice count), the app reports Limit Exceeded with how much you’ve used of what’s allowed, and offers Upgrade Plan. Overage is not billed per unit. To lift a limit, move to a higher plan; for storage you can also buy a storage pack (see the Shramba section on Pregled).
3. Team-wide AI usage
The AI usage page (don’t confuse it with the AI credits page from section 4; the two names differ only by capitalization) shows where AI credits are going across the whole team, not just your own.
- Open Settings → Billing → AI usage.
- Pick a period: This month, Last 30 days or Last 90 days.
- Review the Credits used, Total turns, Avg / conversation and Cache savings cards, and the Top users and Top tools tables.
- The Trend section shows usage over the period, and Failed actions shows agent actions that failed in that period.
4. AI credits: balance and buying more
The AI credits page shows your balance and is the only place to buy more AI credits.
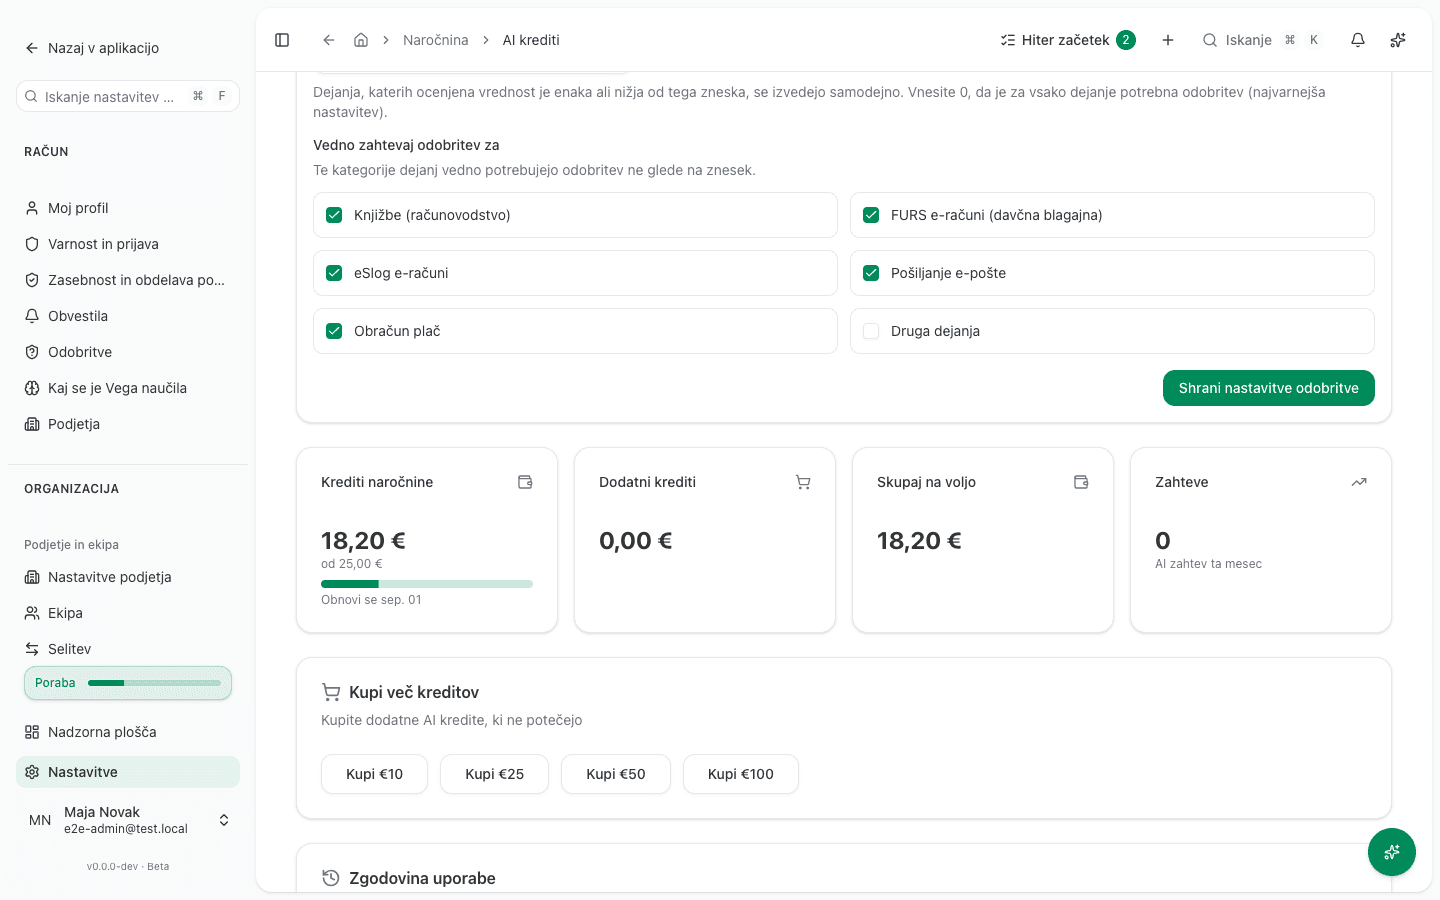
- Open Settings → Billing → AI credits.
- At the top, check Subscription Credits, Top-Up Credits and Total Available.
- To buy more, in the Buy More Credits card pick a credit pack and click its buy button. The app redirects you to Stripe’s secure checkout.
- After a successful payment, the app confirms that your credits have been added, and the purchase appears in the Purchase History card below. Top-up credits never expire.
- Check the Usage History and Recent AI Requests sections to see where your own usage is going, without switching to AI usage.
What success looks like
The app confirms the payment succeeded and your credits have been added. Total Available at the top of the page increases, and a new row appears in Purchase History with status Completed.
Common issues
- An AI action doesn’t run, and the app says you’re out of credits. The message says a document couldn’t be read automatically because you’re out of AI credits, and offers a Top up credits button. That opens the AI credits page (section 4 above).
- You can’t find the right place for AI usage. Two similarly named pages sit in the sidebar: AI usage shows the whole team’s usage (section 3), AI credits shows your balance and lets you buy more (section 4). Only an Administrator sees the latter.
- Clicking a feature your plan doesn’t include does nothing useful. The app shows a notice naming which plan includes it, and a View Plans & Upgrade button. To get access, upgrade your plan (section 1 above) or ask whoever manages your subscription.
- The Change plan button isn’t visible on Plan & limits. The button is hidden for a free or trial plan, where the page shows every available plan to pick from directly instead.
Who can do this
AI usage is visible to any team member with access to the organization.
Plan & limits, Plans and AI credits, meaning changing the plan, buying more AI credits, and anything that charges or changes the subscription, can only be managed by a user with the Administrator role. Without it no setting unlocks those pages; ask your organization’s administrator to make the purchase or the plan change for you.